VM set up instructions
This exercises are based heavily on those developed at Seed Labs. The Virtual Machine (VM) will give us a chance to experiment on a sandboxed network where we can't harm operational networks. The VM will host several Docker containers, where each container represents a computer on a network.
1) Install Virtual Machine
If you haven't done so already, follow these instructions to install the Virtual Machine. This will create a VM on which we will run several Docker containers. I STRONLY recommend taking a snaphot of your new VM in case something goes wrong later, you will be able to restore to a known good state.
2) Install SEED lab containers
The instructions below are taken from SEED Labs Sniffing/Spoofing lab. Check there if you run into problems.
In Lab 1, we will use three machines that are connected to the same LAN. Figure 1 depicts the lab environment setup using containers. We will do all the attacks from the attacker container, while using the other containers as the user machines.
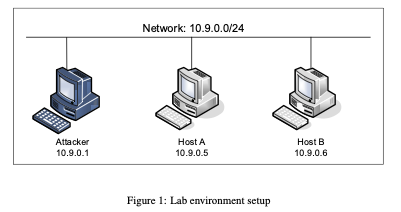
- Attacker: 10.9.0.1
- Host A: 10.9.0.5
- Host B: 10.9.0.6
- Network: 10.9.0.0/24
If this is the first time you set up a SEED lab environment using containers, it is
helpful if you read the user manual. If you encounter problems when setting up the lab environment, please read the “Common Problems” section of the manual for potential solutions.
In the following, we list some of the commonly used commands related to Docker and Compose. Since
we are going to use these commands very frequently, we have created aliases for them in the .bashrc file
(in the provided SEEDUbuntu 20.04 VM). Note: you may need to run sudo apt install docker and sudo apt install docker-compose from a terminal in VM the first time. Do NOT install docker with snap! It causes problems if those items are installed with snap.
All the containers will be running in the background. To run commands on a container, we typically need to get a shell on that container. We first need to use the "docker ps" command to find the ID of the container, and then use "docker exec" to start a shell on that container. We have created aliases for them in the .bashrc file.
Example:
// start VM running
// start terminal in VM
$ mkdir labs # make a new labs directory
$ cd labs # change into that new directory
$ mkdir lab1 # make directory for lab 1
$ cd lab1 # change into lab 1 directory
// download Labsetup.zip (Windows) or Labsetup-arm.zip (Mac) into labs directory
  //Windows use
  $ wget tjp.host.dartmouth.edu/cs60/labs/setup/Labsetup.zip --no-check-certificate
  //Mac use
  $ $ wget tjp.host.dartmouth.edu/cs60/labs/setup/Labsetup-arm.zip --no-check-certificate
$ unzip Labsetup.zip (or unzip Labsetup-arm.zip)
$ cd Labsetup (or cd Labsetup-arm)
$ docker-compose build # first time running, not needed afterward
$ docker-compose up # bring network up, wait until contains are up

// for each network computer where you'd like a shell, start new VM terminal
$ dockps # Alias for: docker ps --format "{{.ID}} {{.Names}}" in .bashrc
$ docksh <id> # Alias for: docker exec -it <id> /bin/bash

// The following example shows how to get a shell inside hostB
$ dockps
b1004832e275 hostA-10.9.0.5
0af4ea7a3e2e hostB-10.9.0.6
9652715c8e0a seed-attacker-10.9.0.1
$ docksh 0a
root@hostB-10-9-0-6:/#
// Note: If a docker command requires a container ID, you do not need to
// type the entire ID string. Typing the first few characters will
// be sufficient, as long as they are unique among all the containers.

//work

//shutdown
$ start a new terminal in VM
$ cd labs/lab1/Labsetup (or cd labs/lab1/Labsetup-arm)
$ docker-compose down # Shut down the network
// close terminals on VM
Do NOT forget to shut down your network with docker-compose down! It may cause issues if you simply close the terminal instead of issuing that shut down command.
About the Attacker Container
In this lab, we can either use the VM or the attacker container as the attacker machine. If you look at the Docker Compose file, you will see that the attacker container is configured differently from the other containers. Here are the differences:
- Shared folder
When we use the attacker container to launch attacks, we need to put the attacking code inside the attacker container. Code editing is more convenient inside the VM than in containers, because we can use our favorite editors. In order for the VM and container to share files, we have created a shared folder between the VM and the container using the Docker volumes. If you look at the Docker Compose file, you will find out that we have added the following entry to some of the containers. It indicates mounting the ./volumes folder on the host machine (i.e., the VM) to the /volumes folder inside the container. We will write our code in the ./volumes folder (on the VM), so they can be used inside the containers.
volumes:
- ./volumes:/volumes
- Host mode
In this lab, the attacker needs to be able to sniff packets, but running sniffer programs inside a container has problems, because a container is effectively attached to a virtual switch, so it can only see its own traffic, and it is never going to see the packets among other containers. To solve this problem, we use the host mode for the attacker container. This allows the attacker container to see all the traffic. The following entry used on the attacker container:
network_mode: host
Getting the network interface name
When we use the provided Compose file to create containers for
this lab, a new network is created to connect the VM and the containers. The IP prefix for this network is 10.9.0.0/24,
which is specified in the docker-compose.yml file. The IP address assigned to our
VM is 10.9.0.1. We need to find the name of the corresponding network interface on our VM, because
we need to use it in our programs. The interface name is the concatenation of br- and the ID of the network
created by Docker. When we use ifconfig to list network interfaces, we will see quite a few. Look for
the IP address 10.9.0.1.
$ ifconfig
br-c93733e9f913: flags=4163<UP,BROADCAST,RUNNING,MULTICAST> mtu 1500
inet 10.9.0.1 netmask 255.255.255.0 broadcast 10.9.0.255
Using Scapy to Sniff and Spoof Packets
Many tools can be used to do sniffing and spoofing, but most of them only provide limited functionality. Scapy is different: it can be used not only as a tool, but also as a building block to construct other sniffing and spoofing tools, i.e., we can integrate the Scapy functionality into our own programs. In this lab, we will use Scapy for each task.
The easiest way to write code on the VM is to start VSCode from the VM, then work from the labs/lab1/Labsetup/volumes (or labs/lab1/Labsetup-arm/volumes) directory. Any code you write will be avilable on the seed-attacker machine (10.9.0.1) in its volumes directory (e.g., start a terminal for seed-attacker and cd /volumes). When done, copy your files to your host (Windows or Mac) machine for submission via Canvas.
Sniffing
To use Scapy, we can write a Python program, and then execute this program using Python. See the
following example. We should run Python using the root privilege because the privilege is required for
spoofing packets. At the beginning of the program (Line ➀), we should import all Scapy’s modules.
# view mycode.py
#!/usr/bin/env python3
from scapy.all import * ➀
a = IP()
a.show()
# python3 mycode.py
###[ IP ]###
version = 4
ihl = None
...


# python3 mycode.py
We can also get into the interactive mode of Python and then run our program one line at a time at the
Python prompt. This is more convenient if we need to change our code frequently in an experiment.
# python3
>>> from scapy.all import *
>>> a = IP()
>>> a.show()
###[ IP ]###
version = 4
ihl = None
...
Wireshark is the most popular sniffing tool, and it is easy to use. We will use it throughout the entire lab.
However, it is difficult to use Wireshark as a building block to construct other tools. We will use Scapy
for that purpose. The following code creates a network sniffer using Scapy:
#!/usr/bin/env python3
from scapy.all import *
def print_pkt(pkt):
pkt.show()
pkt = sniff(iface=’br-c93733e9f913’, filter=’icmp’, prn=print_pkt)
The code above will sniff the packets on the br-c93733e9f913 interface. Please read the instruction
in the lab setup section regarding how to get the interface name. If we want to sniff on multiple interfaces,
we can put all the interfaces in a list, and assign it to iface, such as:
iface=[’br-c93733e9f913’, ’enp0s3’]
Spoofing
As a packet spoofing tool, Scapy allows us to set the fields of IP packets to arbitrary values. We can spoof ICMP echo request
packets, and send them to another container on the same network. We will use Wireshark to observe whether our
request will be accepted by the receiver. If it is accepted, an echo reply packet will be sent to the spoofed IP
address. The following code shows an example of how to spoof an ICMP packet with id=12345 and a sequence nubmer of 1.
>>> from scapy.all import *
>>> a = IP() ➀
>>> a.dst = ’10.0.2.3’ ➁
>>> b = ICMP(id=12345, seq=1) ➂
>>> p = a/b ➃
>>> send(p) ➄
.
Sent 1 packets.
In the code above, Line ➀ creates an IP object from the IP class; a class attribute is defined for each IP
header field. We can use ls(a) or ls(IP) to see all the attribute names/values. We can also use a.show()
and IP.show() to do the same. Line ➁ shows how to set the destination IP address field. If a field is not set,
a default value will be used.
>>> ls(a)
version : BitField (4 bits) = 4 (4)
ihl : BitField (4 bits) = None (None)
tos : XByteField = 0 (0)
len : ShortField = None (None)
id : ShortField = 1 (1)
flags : FlagsField (3 bits) = <Flag 0 ()> (<Flag 0 ()>)
frag : BitField (13 bits) = 0 (0)
ttl : ByteField = 64 (64)
proto : ByteEnumField = 0 (0)
chksum : XShortField = None (None)
src : SourceIPField = ’127.0.0.1’ (None)
dst : DestIPField = ’127.0.0.1’ (None)
options : PacketListField = [] ([])
Line ➂ creates an ICMP object. The default type is echo request. In Line ➃, we stack a and b together to form a new object. The / operator is overloaded by the IP class, so it no longer represents division; instead, it means adding b as the payload field of a and modifying the fields of a accordingly. As a result, we get a new object that represent an ICMP packet. We can now send out this packet using send() in Line ➄.